
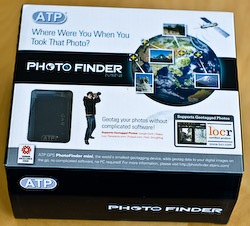
“Where Were You When You Took That Picture?”
With this slogan, ATP Electronics introduces their line of geotagging devices.
Adding precise location tags to photos and being able to display them on a map has been a constant buzz since the technology was introduced, and I have to say that I wasn’t an instant fan.
But things change and technologies evolve, and now, after ATP’s much acclaimed Photofinder, a new generation in the series is ready to hit the market and revolutionize the way geotagging is done, the Photofinder Mini.
Geotagging, an overview
I’ve written before about geotagging, and we have also addressed it on PhotoNetCast. But what is geotagging after all? (is it possible that you’ve never heard about it?)
Geotagging is basically the inclusion of location tags (such as latitude, longitude and, sometimes, altitude) to the metadata of the image files. Using mapping software such has Google Earth & Google Maps, Panoramio, etc. the precise location where the photo was taken can be easily displayed and many photography applications, including Adobe Lightroom 2 and Picasa, are able to read the tag and display the photo on a map.
Usually the location is received from the satellites at certain time intervals (in the seconds range), and the time and coordinates are recorded on the receiver. The principle used to match the location with a certain photo is simply time synchronization: the location tags included in an image file are the ones whose recorded time point on the receiver most resemble the time the photo was taken. This synchronization is mostly done with the help of 3rd-party software able to read the GPS receiver log file and create the tags on the image files. And this is where Photofinder Mini excels – No 3rd-party software required.
Photofinder Mini
The Photofinder Mini brings a new twist to photo geotagging making this product extremely attractive for the general consumer market: No need for 3rd-party software – actually, no need for a computer at all.
In theory, this is how Photofinder Mini works:
- Turn on the receiver and carry it wherever you go on your photo tour;
- Plug the receiver and your card (supports CF, SD, MMC, MS) into the docking station;
- Adjust the time settings on the docking station to match your camera’s;
…and voilà . Everything done and your images are now geotagged and ready to be seen on a map.
Was it really that easy? Well, yes if you shoot JPGs and no if you shoot in RAW. But let me explain…
Hands-on approach
What’s in the box
 Â
 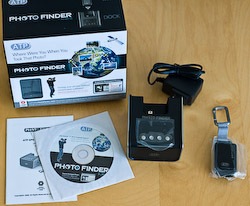
- User manual: It’s small and easy to read, but I got the feeling that some things, like adjusting the time settings on the dock, could be better explained. Not that it’s hard to do, but some not-so-tech-savvy people might require a little more explaining.
- User manual, on a CD: come on, is it really needed? I understand that country regulations require companies to include a paper manual, but if you already have the manual online (pdf) why the cd?
- Power supply
- Docking station: The real innovator. A display, pretty basic but there’s no need for a better one, four buttons, slots for cards and the dock for the GPS receiver, that’s all that is needed. And since you can connect it to a computer, you can use it as card reader.
- GPS receiver: At 40 grams and 6 cm (just over 2 inches) on the widest size, you can’t get anything less obtrusive. Comes with a clip to attach the receiver to whatever you want (pants, camera bag, etc). Besides that, it looks good. Insides, comes with a rechargeable battery providing juice for over 16 hours of operation and a 128Mb MMC card capable of holding about 550 hours of coordinates. If you want to skip the docking station (more on this bellow) you can connect the receiver directly to your computer, which also recharges the battery.
My experience with the Photofinder Mini
Acquiring data and positioning precision
After turning the receiver on, it took about 14 minutes to receive the ALMANAC data (satellite information). This is normal and should happen only once or if you travel over 500 Km. The following times it took about 30-40 seconds to start acquiring data.
I ran a few tests, inside or outside buildings and urban or rural areas, still without camera. After transferring the log file to Google Earth, I’ve noticed that the receiver is extremely precise on clear areas never missing a point. Around tall buildings it can skip a beat or two but the biggest error I got was about 50 meters, so not bad. Inside buildings it performs the worst, as expected.
Turning the camera on
Although the majority of consumer cameras, specially P&S, save images as JPEG, I like my images in RAW. This posed the first problem: as with the majority, if not all, of the geotagging devices on the market, and due to the proprietary formats of RAW files, only JPGs are supported by Photofinder Mini. This problem for RAW shooters can be overcome by three different approaches:
- Shoot in both RAW and low quality JPG (to minimize file size)
- Shoot in RAW only and use software for the synchronization
- Shoot RAW and tag your files after processing and exporting to JPG
The way I look at it, this is a disadvantage because you can’t use the simple workflow that the Photofinder Mini is so innovative for, but is also an advantage because I really don’t want any application touching my RAW files before they are safely stored and backed up.
I went out to photograph and opted by shooting in RAW and low quality JPG. With this approach I have my separate RAW files and a JPG file that the Photofinder Mini can use to insert location tags. On return, I backed up the card files and, as expected, after inserting the card on the slot and docking the receiver, tagging went flawlessly. All my JPGs were correctly tagged. Then it was a matter of synchronizing metadata from the JPGs to the RAW files in Lightroom.
Then I tried to find out what was possible to do if I only had RAW files. Using my backed up RAWs (without the location tags), I exported the log file from the GPS receiver directly to the computer and used a popular free software, GeoSetter, to insert the tags into xmp sidecar files. Upon importing into Lightroom (which reads the information from the sidecar file), all the files were perfectly tagged.
The third, and my least preferred approach, is to tag JPGs after processing the RAW files. After processing the RAW files in Lightroom, I exported the resulting JPGs into a card and inserted it into the docking station. The Photofinder Mini didn’t fail and was able to tag the files. The disadvantage of this method is that you have to copy the files again from the card to your storage location and re-import them into Lightroom and then synchronize the metadata with the RAW files. Also, I don’t always want all my RAW files as JPG or I might even processed them much later.
From any of these methods, the JPGs end up tagged and can be placed on a map. But again, if you shoot in JPG and don’t even know what a RAW file is, then geotagging your images with the Photofinder Mini is really just a one-step process: insert the card, and it’s done.
Pros & Cons of the Photofinder Mini
Pros:
- Innovative and easy to use: The idea of inserting location tags into image files without the need for 3rd-party software, or even a computer, is very attractive. I imagine this could be some kind of barrier for many people, and it’s now possible to answer that question “Where Were You When You Took That Picture?” without much hassle.
- Attractive: The GPS receiver that actually has to go with you looks good, it’s small and lightweight.
- Precise: I have tried only one other geotagger before (that shall remain unnamed) and the precision of the acquired location data was not even close to the one returned by the Photofinder Mini.
- Price: The recommended sale price for this unit will be US $149. Knowing that many other geotaggers out there sell for around this price or are more expensive and consist only of the GPS receiver, this price seems ok to me, not too cheap but not expensive.
- Battery: I’ll look at this both has an advantage and a disadvantage (see bellow). The unit uses a rechargeable battery good enough for 16 hours of continuous use and thus eliminates the need for carrying extra AAA batteries. Plug the unit to a computer or the docking station and it recharges the battery through USB. Simple.
- Card reader: The dock also works as a multi-format card reader (CF, SD, MMC, MS) and you can use it to transfer your files from a card into your storage place, even if you don’t want to geotag anything. Also, the GPS receiver has a MMS card slot (comes with a 128Mb MMS card for recording of log files) and this opens the possibility to update the firmware of both units easily.
Cons
- Battery: As I noted above, the GPS unit is powered by a rechargeable battery. A non-replaceable rechargeable battery… Although the 16 hours of use per battery charge sounds good, if I go on vacation for 2 weeks and decide not to carry a computer I’ll have to carry the dock to be able to recharge. Since the 128Mb MMS card is able to store up to 550 hours of data, I’d like the possibility of either having replaceable batteries, or a AAA battery slot that could be used after the main battery is down.
- No RAW support: As I also mentioned above, this is both an advantage and a disadvantage. In any case, after a nice conversation with a representative from ATP, I learned that RAW support is in the works, should come soon, and probably all it will be required is updating the firmware of the docking station.
- Confusing LED display: The GPS receiver tells you that it is on, is communicating with the satellite and recording data by flashing some little LEDs. What it is actually telling you is differentiated by a sort of light code (flash once every second, or twice every second, etc). This can be confusing and not so easy in bright sunlight. I know, I’m picky…
- No option to choose which images to tag: If it tags, it tags them all. It would be good to be able to select which images to tag on the dock unit. But then it would probably require a better display and the price would be higher. So, it’s a balance and a minor thing.
In conclusion
For someone who was not completely sure about geotagging, I’m now converted. As a reader mentioned on a comment before, geotagging might sound just another step on the workflow, but if for someone that travels around, photowalks and even for street photographers, with time, geotagging shows its true value.
The ATP Photofinder Mini is overall a good solution for both JPG shooters (for its easiness of use and functionality) and RAW shooters (for its precision). If you’re thinking about starting to geotag your images and none of the “cons” is off-putting to you, consider including the ATP Photofinder Mini on your to-buy options. It convinced me, and it convinced the editors of CHIP magazine (Germany) that awarded it the 2008 Best Accessory of the Year at Photokina.
UPDATE: A representative of ATP will be joining us on the next episode of PhotoNetCast to talk about the Photofinder Mini and the innovation it brings to the geotagging technology.
Please Note: A production unit of the ATP Photofinder Mini was sent to me by the manufacturer for review. Financial compensation was not and will not be received and the review was not read or edited by the manufacturer before publication. The opinions expressed are mine alone and reflect my own tests with the product.


Pingback: Photo Reviews From the Internet / Friday 14-November-2008
Pingback: Link Roundup 11-15-2008
Pingback: Weekend Perusing: Painting the Town RED | Your Photo Tips
Pingback: PhotoNetCast #17 - Geotagging with the Photofinder Mini | PhotoNetCast
Pingback: PhotoNetCast #17 with a big giveaway | Words: Irrational
Hubert Kay
November 26, 2008 at 7:19 am
Thanks for the review – well done! Personally, I choose the “Gisteq Phototrackr lite” GPS unit for one simple reason: the Gisteq Phototrackr software actually writes geotags into the most popular RAW files (including the Canon .CR2 format I am using).
A Marques
November 26, 2008 at 10:56 am
Hi Hubert,
That is interesting. How do they handle the newer RAW formats? Software updates or does it write to a sidecar?
Hubert Kay
November 26, 2008 at 3:03 pm
via software updates. They are nowhere near complete, of course. However, you always have the option of writing the data into an Adobe format xmp sidecar file.
Pingback: Anthony Skelton Photography » Geotagging: Where did I shoot that?
Mike
December 3, 2008 at 10:06 am
Again on the raw formats. What’s the danger of looking at the date and timestamp of the files on the CF, rather than looking at the xmp data within the files? Are these often different?
A Marques
December 8, 2008 at 8:30 pm
Hi Mike,
There is no “danger” of looking at either the date and time of the files or the metadata inside them. The problem is that each camera manufacturer and usually even different cameras from the same brand write the RAW files in different ways and the metadata is stored at different locations within the file. These formats are proprietary and it’s not easy to have a little device updated with the formats. I’m not even sure if it would be legal to reverse engineer the files to find where the information is stored. This is also the reason why whenever a new camera comes out software like ACR or Lightroom take some time to release updates to support the cameras.
Since the JPG format is not proprietary, the information is stored always on the same location within the file and geotagging devices “know” where to find the information and where to write it.
Thanks for the comment.
Mike
December 8, 2008 at 9:05 pm
What I meant was looking at the timestamp on the filesystem… that way you don’t have to go into the xmp of the “proprietary” file.
And if it is so proprietary, why can Adobe and Apple do it and not ATP photofinder?
On a sidenote… where did my trackback go to? I remember seeing it here (did it move to spam?)
A Marques
December 8, 2008 at 9:12 pm
Getting the date and time from the file is probably not the problem. The question then is, where do you write the data to? As I suggested, one approach would be to write it to a xmp sidecar file.
Apple and Adobe can do it because first, they probably have close relationships with the manufacturers, and second because they can launch updates easily. It’s not so easy to do on a device. Firmware updates would be a possibility but then it could be limited by the processing capacity of the device (it would have to open the huge RAW files).
As for your trackback, are you sure you’re not thinking about it on PhotoNetCast?