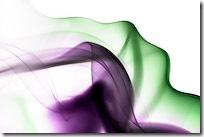
I had seen abstract photography of smoke before, but never really thought much on how to create it until I caught myself observing the movements and patterns of smoke coming from a burning incense stick. I decided to give it a try and the results were satisfactory. After I published a few of my smoke abstracts to my flickr photostream, some people asked me how I had created such images. I can’t really say this is the best technique or the one that will give the best results since I haven’t tried it in any other way, but I guess it’s a way to do it.
So, here it is, photographing smoke abstracts explained.
What you need
A source of smoke
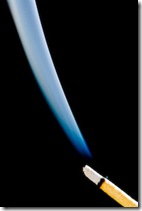
These photos were created with a burning incense stick, but it’s not the only option. Just keep in mind that not everything that burns will give you good smoke to use in your images.
- No open flame – If it’s burning with open flame, you’ll have too much hot air flowing up which will disrupt the steady lines of smoke you want.
- Small burning surface – The burning surface needs to be small or you’ll get too much smoke dispersed in a wide area leading to poorly undefined lines.
- Gray smoke – The smoke needs to be gray in order to reflect a good amount of light without overexposing.
A good background
The smoke will have some transparency and you don’t want the background interfering with your images. This is specially important if you plan to invert the images (more on this bellow). You’ll also have an external light source lighting the smoke, so backgrounds that reflect light can’t be used. For my images I’ve used a piece of the blackest non-glossy cardboard I could find. I imagine that pure black cloth can also be used.
External light source
For this kind of images, you’ll need a lot of light and you’ll need to be able to choose a placement for the light source, so your camera flash won’t work. I’ve used an external strobe triggered remotely by the camera’s flash. You’ll also need to be able to control the flash output manually as the TTL measurement won’t be any good.
The setup
 Choosing your lens
There is no need for a particular type of lens and you can get good smoke abstract photos with any lens you choose. The choice of lens will depend on much of the smoke plume you want to capture and the distance you want to be from the smoke source. For these images I’ve used a 105mm macro lens. This allowed me to be far enough that my breathing and moving did not disturb the flow of smoke (undisturbed smoke can be captured almost as a straight rising column) and close enough that if I intentionally wanted to disturb the plume, I just needed to blow softly. The disadvantage of a prime is that any zooming is done by moving the camera.
Placing your light
The trickiest thing about the setup is the placement of the light source. You need to place your flash in such a way that
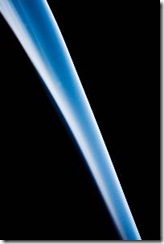
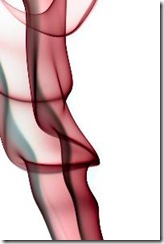
- No light hits the background – any light hitting the background will define it and you’ll get something like what is shown on the photo to the right.
- No light hits your lens – light hitting your lens directly will cause flare-like effects.
- The smoke is homogeneously lighted – this is best achieved with a diffuser but if placed correctly you don’t even need one.
After some experimenting I’ve opted by placing my light to the right, slightly back from the incense stick and bellow the smoke, with the head at an angle. The placement of your light will also be affected by the lens you choose: the more distance you put between the lens and the smoke, the more liberty you’ll have to place the light without directly hitting your lens.
Camera settings
The smoke is not going to flow all in the same focal plane so you need enough depth of field to have the plume in focus. Start at something like f/11 or f/16 but these values will, of course, be affected by the focal length of your lens and your distance to the smoke.
As for shutter speed, you have to remember that you want to freeze the smoke as much as you can, so a fast shutter is a must. I’ve used 1/250 of a second. Remember that you might be limited by the maximal synchronization speed of your flash.
The ISO should be set as low as possible. Any noise in the background will result in very ugly images. You want your background pure black, not speckled.
Flash output
As I mentioned above, your best approach is to manually control the output of your strobe. You need enough light so that the areas with higher smoke density are almost white but not blown out. This should give you nice gradients as the smoke thins.
Tripod or hand-held?
Smoke is fast and the shapes highly dynamic. To use a tripod or not it’s up to you but remember that the smoke is not going to wait until you adjust your camera on the tripod for a new composition. Also, the fast shutter speeds should allow you to hand-held your camera without much motion blur.
Processing
Processing your images will heavily depend on your creativity but one thing you need to make sure of is that your background is pure black. This is specially important if you plan to invert the image. So play with your curves and/or clone out any areas that are not black.
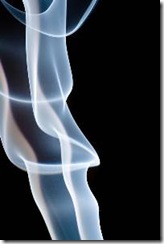
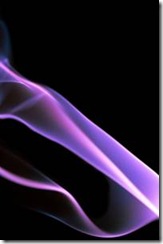
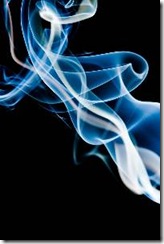
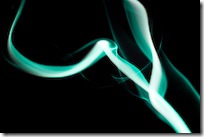
 All the images I’ve shown you so far, with the exception of the first, didn’t go through any processing and the blue color is the result of the Auto White balance, but you might want to do some color shifting and even invert the image to create higher impact photos. If your background is pure black, you can simply use hue and saturation on Photoshop (or other software) and choose the hue you’d like your final image to have. Want more than one color? No problem just repeat the process in different layers and use masks.
I hope that you find the explanation of my technique on how to photograph smoke abstracts useful and that it will allow you to create some great photos. Since I have access to both liquid nitrogen and solid carbon dioxide, and at room temperature they originate a nice thick-flowing vapor, I’ll probably try to photograph them next… But that is another story and for another time.
Scott Fillmer
November 1, 2008 at 3:01 am
great how-to for a subject that looks like something very hard to capture… I will have to give it a try and see if I can get something usable, thanks.
A Marques
November 1, 2008 at 4:12 am
Hi Scott,
I was also thinking that it would be much more difficult but if you have “good quality smoke” (don’t know how this just sounded but ok) it get’s much easier. As I mentioned, the hardest is the lighting. The placement of the strobe can be specially difficult but with a little trial-and-error it’s manageable.
Give it a try and tell me how were the images like.
Pingback: Link Roundup 11-01-2008
Landi Jonck
November 3, 2008 at 2:11 pm
very in-depth how-to. i tried experiments with smke before but have not yet been too succesfull. the placement of the light source is definately the tricky part.
Pingback: Brausafrüchtchen : Foto Links & News 2008#11#05 » Beitrag » Digitale Fotografie Lernen - KWERFELDEIN - Martin Gommel
Nirav
February 6, 2009 at 2:01 am
This is a great how-to. Thanks a lot for sharing. You covered everything briefly from setup to post processing and that really helps. Leave some to the creativity but at the same time you provided key concepts.
Photography Art Cafe
October 1, 2010 at 1:06 pm
Great tutorial, thanks. Been wanting to do this for a while. I’m pleased your instructions don’t rely on having too much gear!