 I’m feeling a bit weird writing about underwater photography knowing that it’s freezing cold outside. Nevertheless, there are so many places where, by this time of the year, it’s warm and the water is inviting for a dive.
For those of you lucky enough to live in such a place, or as many do, spend the holidays near a water paradise, and want to record those moments not only above water but also bellow it, here are a few basic tips for underwater photography.
While some more advanced underwater photos (and of course better ones) will require specific and often expensive equipment, not to mention time spent on diving courses and all the equipment required for it, there is no reason not to try it with a more budget-friendly approach and, with time, go for the gold. But for now, let’s keep above the 10 meters (33 feet) level.
The basics: choosing and preparing the equipment
Just keep in this in mind: any beach is a highly hazardous environment for your camera. High amounts of sand, dust and moisture can quickly turn a good camera into a piece of expensive junk. Although there are available “sealing kits” that supposedly wrap your camera on a protective housing and protect it from dust and moisture, and some even allow you to take your camera underwater to low depths, personally I’ve never tried them. There is something about taking my camera underwater that puts me off. So what are the alternatives? Go for cheap and dirty: try a disposable underwater camera.
Disposable underwater cameras are simple cameras pre-loaded with film, protected inside an acrylic case. You can use them around and underwater up to a certain depth. Don’t expect “National Geographic” quality photos, but for beginners they are the best choice.
And now I’m imagining you thinking: “I’m already on the digital age, I have my workflow set, I’m used to digital processing, why would I go back to film and above all on a… ugh… disposable?”. Well, it’s your camera and it will be surrounded by water with increasing pressure as you go down. If you don’t have the money for a custom case that you’ll probably use once a year for a few shots, why not?
Choosing the right disposable camera
As with any other field in photography, there is a multitude of options available. The good news? As it is disposable, it will be cheap and the most you’ll loose if everything goes wrong is the camera and developing costs. From my personal experience, I never had a situation in which everything got ruined.
Before choosing which camera to take, there are several variables that you need to consider:
- How clear is the water
- Up to which depths do you want to dive
- Flash or no flash
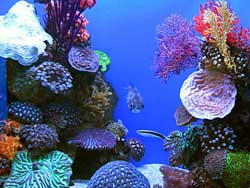
 Water works as a massive light filter. The further you go from the surface, the less light you will have available and importantly, the less red light you’ll have. If you stay above the 10 meter (33 feet) level, this is not a major issue (although it’s noticeable), but if you want to go deeper you simply need to provide your own red light source. This is why photos taken with this kind of equipment tend to be blue all over. Bellow 10 meters, a camera with flash is a must, even in clear waters. This poses another problem: If there are particles in the water, the flash light will reflect on them and overexpose your photos. So, try to choose your camera based on what you want to shoot and the conditions you’ll have in the water.
This might sound too simple if you think that you are used to be worried with apertures, shutter speeds, depth of field, etc., and now you won’t have to. But realize that underwater you have many other things to be worried about: try staying still at 5 meters to correctly frame your photos in a water with just slight current and you’ll see what I mean.
As a guideline, try looking at the specs of three well-known underwater disposable cameras: Kodak Ultra Aquatic, Agfa LeBox Ocean, Fuji QuickSnap Marine.
Taking the shot
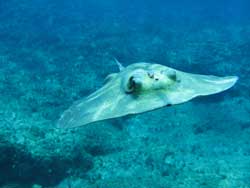
As I mentioned above, when underwater you don’t have the luxury of time to correctly frame a shot, or choose the best angle, specially if you intend to shoot wildlife. First, as as you’ll notice very very quickly, unless you take a bottle with you, you need to surface on a regular basis (yes, breathing is essential) and the cute little fish won’t stay there waiting for you. Also, looking through the camera with a diving mask on your face is much harder than it sounds. The fact that you won’t have a zoom on this camera will also require that you get as close as possible to your subject while keeping you and the subject safe.
As a good advice, if you have the time, try shooting your camera of choice on an open-air swimming pool just to get the feeling of it.
If possible, try shooting between 11 AM and 2 PM to make use of the higher levels of light penetration on the water. The angle at which light enters the water earlier or later in the day will reduce the depths at which you can shoot.
Developing the film
While the films inside these cameras have nothing special about them, you can improve the end result by taking it to a shop that specializes in underwater film processing. They are not so easy to find but the difference between the special processing and the regular film processing can have dramatic effects on the prints, making them much more vibrant and reducing the blue cast they will have otherwise.
Although this article is not extensive, I hope I managed to provide a few tips to spark your curiosity about underwater photography next time you go to the beach and improve your experience and results.
Have you tried underwater photography on a basic level? What other tips and experiences can you share with us? Leave them on the comments right bellow.
Pingback: photographyVoter.com