I usually have some hard time knowing what to do with this kind of project, specially because I have an image to work with but it jumps in the middle of the creative process. What I mean with this is, when I make a photo, I have the final outcome in mind before I press the shutter (maybe this is something that crossed from film) and I know what I want to do with it in processing. Grabbing someone else’s photo and deciding what to do with it is simply missing that “other partâ€, the why.
But here is my attempt.
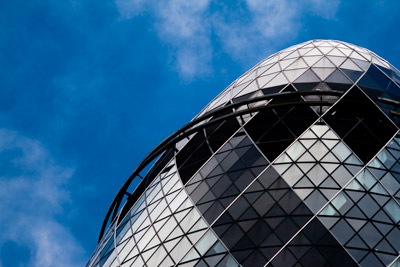
In the beginning…
This is the original image Phill provided.

Before even trying to do anything with it, I started by trying to figure out where my eyes were moving in the image – the right upper corner. Not good. Somehow I wanted to focus on the patterns in the building, not in some clouds. Also, the separation between the edge of the building and the sky surrounding it didn’t attract me. So, time to correct this.
In Lightroom, lowering the luminance of blue and green and a slight S curve improved it. But there was still that patch of clouds on the right upper corner… Time for Photoshop and a little cloning.
This is the result after these steps.
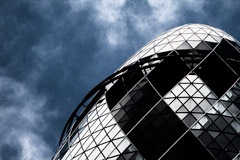
Ok, so time to focus on the sky. It looks ugly now. Since the building is out of ordinary in design and gives a feeling of coldness and separation (at least to me), time to give it some out of ordinary sky and make it more “steel-lookingâ€.
I inserted a channel mixer layer set to monochrome and a +62% blue. This layer was set to overlay with 75% opacity. Usually, this leads to an image with way too much contrast and saturation. So, a new curves layer, set to luminosity, was used to try and correct it and decrease the general contrast a bit. After this, time to give it the “steel-lookâ€. A new hue & saturation layer with a 50% reduction in overall saturation.
It now looked like this.
I was starting to get happy with it. But my eyes were still not locking on the dark shapes on the building. Still too much distraction around the bottom. I needed more contrast in the building. A new curves layer to increase contrast masked for the building (excluding the sky) improved it. Now for the final touch, back in Lightroom. A little touch of vignette just to slightly darken the corners and really direct the eyes to those shapes in the building.
And this is it…

I won’t say this was the best way to process it, or even that I’d process it this way if it was my photo. But I was happy with the final result. I think the overall effect suits the building.
What do you think about it?
]]>
I had seen abstract photography of smoke before, but never really thought much on how to create it until I caught myself observing the movements and patterns of smoke coming from a burning incense stick. I decided to give it a try and the results were satisfactory. After I published a few of my smoke abstracts to my flickr photostream, some people asked me how I had created such images. I can’t really say this is the best technique or the one that will give the best results since I haven’t tried it in any other way, but I guess it’s a way to do it.
So, here it is, photographing smoke abstracts explained.
What you need
A source of smoke
These photos were created with a burning incense stick, but it’s not the only option. Just keep in mind that not everything that burns will give you good smoke to use in your images.
- No open flame – If it’s burning with open flame, you’ll have too much hot air flowing up which will disrupt the steady lines of smoke you want.
- Small burning surface – The burning surface needs to be small or you’ll get too much smoke dispersed in a wide area leading to poorly undefined lines.
- Gray smoke – The smoke needs to be gray in order to reflect a good amount of light without overexposing.
A good background
The smoke will have some transparency and you don’t want the background interfering with your images. This is specially important if you plan to invert the images (more on this bellow). You’ll also have an external light source lighting the smoke, so backgrounds that reflect light can’t be used. For my images I’ve used a piece of the blackest non-glossy cardboard I could find. I imagine that pure black cloth can also be used.
External light source
For this kind of images, you’ll need a lot of light and you’ll need to be able to choose a placement for the light source, so your camera flash won’t work. I’ve used an external strobe triggered remotely by the camera’s flash. You’ll also need to be able to control the flash output manually as the TTL measurement won’t be any good.
The setup

 Choosing your lens
There is no need for a particular type of lens and you can get good smoke abstract photos with any lens you choose. The choice of lens will depend on much of the smoke plume you want to capture and the distance you want to be from the smoke source. For these images I’ve used a 105mm macro lens. This allowed me to be far enough that my breathing and moving did not disturb the flow of smoke (undisturbed smoke can be captured almost as a straight rising column) and close enough that if I intentionally wanted to disturb the plume, I just needed to blow softly. The disadvantage of a prime is that any zooming is done by moving the camera.
Placing your light
The trickiest thing about the setup is the placement of the light source. You need to place your flash in such a way that
- No light hits the background – any light hitting the background will define it and you’ll get something like what is shown on the photo to the right.
- No light hits your lens – light hitting your lens directly will cause flare-like effects.
- The smoke is homogeneously lighted – this is best achieved with a diffuser but if placed correctly you don’t even need one.
After some experimenting I’ve opted by placing my light to the right, slightly back from the incense stick and bellow the smoke, with the head at an angle. The placement of your light will also be affected by the lens you choose: the more distance you put between the lens and the smoke, the more liberty you’ll have to place the light without directly hitting your lens.
Camera settings
The smoke is not going to flow all in the same focal plane so you need enough depth of field to have the plume in focus. Start at something like f/11 or f/16 but these values will, of course, be affected by the focal length of your lens and your distance to the smoke.
As for shutter speed, you have to remember that you want to freeze the smoke as much as you can, so a fast shutter is a must. I’ve used 1/250 of a second. Remember that you might be limited by the maximal synchronization speed of your flash.
The ISO should be set as low as possible. Any noise in the background will result in very ugly images. You want your background pure black, not speckled.
Flash output
As I mentioned above, your best approach is to manually control the output of your strobe. You need enough light so that the areas with higher smoke density are almost white but not blown out. This should give you nice gradients as the smoke thins.
Tripod or hand-held?
Smoke is fast and the shapes highly dynamic. To use a tripod or not it’s up to you but remember that the smoke is not going to wait until you adjust your camera on the tripod for a new composition. Also, the fast shutter speeds should allow you to hand-held your camera without much motion blur.
Processing
Processing your images will heavily depend on your creativity but one thing you need to make sure of is that your background is pure black. This is specially important if you plan to invert the image. So play with your curves and/or clone out any areas that are not black.

 All the images I’ve shown you so far, with the exception of the first, didn’t go through any processing and the blue color is the result of the Auto White balance, but you might want to do some color shifting and even invert the image to create higher impact photos. If your background is pure black, you can simply use hue and saturation on Photoshop (or other software) and choose the hue you’d like your final image to have. Want more than one color? No problem just repeat the process in different layers and use masks.
I hope that you find the explanation of my technique on how to photograph smoke abstracts useful and that it will allow you to create some great photos. Since I have access to both liquid nitrogen and solid carbon dioxide, and at room temperature they originate a nice thick-flowing vapor, I’ll probably try to photograph them next… But that is another story and for another time.


]]>
 On one of my previous posts I shared 5 Tips for Acquiring Old Cameras. One of the comments on this post was made by Jessica where she simply stated "Then again, if they don’t work, you could always use them for TtV!".
I had heard of TtV before but, as a technique, was something that I was never curious to experiment with. But my curiosity definitely spiked after seeing some of Jessica’s photos using this method and I’ll be trying it in the near future.
So, I asked Jessica if she could go a little further on the subject of TtV, not only for me, but for all my readers that are not so familiar with the technique.
And here is what Jessica had to say…
TtV / Tee Tee Vee / abbr.
Through The Viewfinder: The technique of using one camera to take a picture via another camera’s viewfinder.
Your first impression may be that the technique sounds somewhat absurd. I’m here to tell you that the results are simply stunning. Let me fill you in on this method that will have you scrambling to get your hands on a camera of your own to try out this fairly new technique.
The Cameras
In order to achieve the highly unique and nostalgic, square format look, you will first need to acquire a base camera. Typically, the bottom viewing camera is a TLR, a twin lens reflex, which has a waist-level, bubble-like viewfinder. The viewfinder happens to be one of the most charming aspects of this method, as it creates a slightly out of focus fish-eye effect that is reminiscent of a dream. It also leaves your image with a natural black frame that adds to the already vintage look.
Some of the most commonly used TLR’s are the Kodak Duaflex, Starflex, and Brownie. Some other manufacturers to consider are Argus and Anascoflex; although, this doesn’t scratch the surface of everything that is available. If you’re not lucky enough to find one of these types of cameras locally, you should have no problem finding one through the ever-so-popular Ebay to locate a retro treasure of your very own. An extremely informative article is "5 Tips for Acquiring Old Cameras".
The Method
 Finding a TLR that actually works isn’t necessary – since you don’t need to use film. However, there are certain warnings to regard when buying based on descriptions and photos alone. The old-fashioned look obtained with the method is in part due to how the camera shows age with dirt, dust, and scratches. As these conditions can enhance the dirty-lens style, you don’t want the imperfections to be so bad that they become an obstruction. I have yet to do this myself, but you can carefully take the camera apart to clean the lenses in the event that you find one with oodles of mold or very thick dust. Another possible impediment may be those lenses which contain grid lines or bullseye type marks on the viewfinder, which in turn becomes a part of your photo. Although you may like the outcome of that result.
Before you decide to join the ranks of TtV photographers, there are other facets of the craft that you need to prepare for. In addition to the base camera we talked about earlier, you will need a macro lens and a contraption, which seals out light. With the macro lens attached, you will want to measure the distance that you must maintain to get your digital camera to focus through the TLR’s viewfinder. Doing this will determine how tall your contraption needs to be. Without this, it is a lot harder to get a properly exposed shot. Once you’re ready to make a contraption, take a look around the house, chances are you have materials laying around that can be quickly fashioned into something suitable; I’ve even seen some made from cereal boxes before. To get an idea, please check out my contraption.
Getting started with this new technique is the easy part, but learning to manage and maneuver two cameras at once proves to be a bit of a challenge at times. However, I am of the opinion that the results are well worth the extra effort involved to capture such captivating images. You can find many ideas as well as inspiration within the "Through The Viewfinder" flickr group. I encourage you to peruse the forum for any further questions you may have about the technique. I sincerely hope that you found this information to be useful, although it is not intended to be a definitive guide by any means.
The Author
Originally from Florida, Jessica Maceda currently resides within the Blue Ridge Mountains of Western North Carolina. She carries with her a deep appreciation for nature, and an unwavering passion for photography. Many of her experiences are shared through a blog called Wayfaring Wanderer. You can also find her photos (including TtV work) on her flickr photostream.
]]>
Recently I had the opportunity of acquiring an old camera. By old I don’t mean "it still uses film" old, I mean "really" old on the antique level.
I’m not an expert in the industry of antiques acquisition but since I had this opportunity I started doing a little research. In any case, my approach in this article is not for those who want to buy an old camera to sell it later for profit (although many things I’ll mention would still apply).
The market is huge and has many different variables that can affect the outcome of a good deal. Nonetheless, there are a few basic things you need to consider before pulling out your credit card to pay for a beauty like this.
1 – Why do you want to buy an old camera?
Resist the buying impulse. I know old cameras are beautiful and very tempting, but defining why you want one is probably one of the most important things you need to think about. Do you want it just for the looks of it, to exhibit it on a shelf on your living room not to be used, or do you intend to load it and actually take it to the field and use it?
Your answer will determine the working condition you need the camera to be in and thus the amount you may expect to pay for one.
2 – Where to buy an old camera?
This one is endless. Everywhere, from yard sales to ebay. Just look around a bit and I’m sure you can find many for sale. The question is, what do you want to buy.
If you have a specific camera in mind you can try on a specialized dealer. You’ll get to talk with someone who is probably doing this for years and knows what he’s talking about. Usually these people can describe exactly the condition the camera is in and, if they have it on the store, you can handle it and examine for yourself all the little details. The downside is that you’ll probably end up paying a little more.
Online auctions can provide good deals but are a bit more risky since you won’t have the chance to have the equipment in your hands before you buy.
3 – Do your Research
That’s what Google is there for.
And I’m not talking just about the prices (more on that bellow).
Nowadays, you know what to expect from a camera and everything is described in much detail on the manufacturer’s catalogs. On the "old" days, not everything was so clear and some batches of cameras could come into the market with mechanistic issues that never got solved. Specially if you are planning to use the camera, you need to know if there were problems that you don’t want to deal with now (as an example, the Kodak Signet 35 had a very problematic shutter). Also, while today any change in the model is reflected in the model name, it wasn’t always so. The same model name did not always describe the same equipment (as weird as it may sound). My best advice is to always know the serial number of the camera you want to acquire and do your research on it. If you look around, there are sites maintained mainly by collectors (and usually dedicated to a specific brand) that list serial number ranges and any particular modification done to a specific batch.
4 – If you want to use it, make sure it’s usable
The camera condition is of uttermost importance, specially if you intend to use it. While you probably won’t mind the normal signs of age and use, a crack in the bellows or fungi in the lenses will render the camera unusable until it is repaired (if indeed it can be repaired). This is specially dangerous if you’re buying it online. If a camera is listed as sold "as is" you probably won’t have the chance to return it even if you find out that the seller forgot to mention the rusty lens mount. Try to ask as many questions as you can and know all the details on the condition of the camera. If possible, and many times it is not, if the seller is the person who used the camera before, try to find out how many photos were taken (the life of a shutter screen is not unlimited). Any sign that the camera was ever dropped is also a big no-no.
5 – The value… oh yes, the value – Know it before you buy
The first thing that many sellers think (usually people dealing with antiques, but not specifically cameras) is that the oldest a camera is, the more valuable it is. Don’t fall for this one. It’s not so. There are cameras that are valued at a few thousand dollars, and other cameras from the same period that are worth next to nothing. This has to do with how rare a camera is (how many were manufactured vs how many lasted until now), how good it is, and also how famous it became on the hands of a particular photographer.
The price that a seller asks can be an educated value or just simply someone throwing a price out and waiting for it to stick. You can have a taste of this on ebay. Search for a particular camera model and you’ll probably see a very wide range of prices asked. This, of course, depends on the condition of the camera, but can also reflect sellers not knowing the value of their items.
Again, Google is your friend and, for many cameras, you can find good estimates of the values. If you want a more educated guess, there are a few price lists in print that can help you.
With this article I do not intend to give you all the information you need, but buying an old camera can be a risky business, specially if you want to use the camera, and these are just a few tips to get you started.
While doing some research for this subject, I found some books that were recommended on some forums. I don’t have them, so I can’t really say if they are good or not. Just in case you are curious, here are their links on Amazon:
Have you ever thought about acquiring an old camera? If so, why? Any bad or good stories to share?
]]>Thomas Hawk shares 10+1 basic tips for all those starting with dSLR photography.
Hats off for Thomas.
Any other simple and yet effective tips you usually apply on your daily photography? Share them bellow.
]]> I’m feeling a bit weird writing about underwater photography knowing that it’s freezing cold outside. Nevertheless, there are so many places where, by this time of the year, it’s warm and the water is inviting for a dive.
For those of you lucky enough to live in such a place, or as many do, spend the holidays near a water paradise, and want to record those moments not only above water but also bellow it, here are a few basic tips for underwater photography.
While some more advanced underwater photos (and of course better ones) will require specific and often expensive equipment, not to mention time spent on diving courses and all the equipment required for it, there is no reason not to try it with a more budget-friendly approach and, with time, go for the gold. But for now, let’s keep above the 10 meters (33 feet) level.
The basics: choosing and preparing the equipment
Just keep in this in mind: any beach is a highly hazardous environment for your camera. High amounts of sand, dust and moisture can quickly turn a good camera into a piece of expensive junk. Although there are available “sealing kits” that supposedly wrap your camera on a protective housing and protect it from dust and moisture, and some even allow you to take your camera underwater to low depths, personally I’ve never tried them. There is something about taking my camera underwater that puts me off. So what are the alternatives? Go for cheap and dirty: try a disposable underwater camera.
Disposable underwater cameras are simple cameras pre-loaded with film, protected inside an acrylic case. You can use them around and underwater up to a certain depth. Don’t expect “National Geographic” quality photos, but for beginners they are the best choice.
And now I’m imagining you thinking: “I’m already on the digital age, I have my workflow set, I’m used to digital processing, why would I go back to film and above all on a… ugh… disposable?”. Well, it’s your camera and it will be surrounded by water with increasing pressure as you go down. If you don’t have the money for a custom case that you’ll probably use once a year for a few shots, why not?
Choosing the right disposable camera
As with any other field in photography, there is a multitude of options available. The good news? As it is disposable, it will be cheap and the most you’ll loose if everything goes wrong is the camera and developing costs. From my personal experience, I never had a situation in which everything got ruined.
Before choosing which camera to take, there are several variables that you need to consider:
- How clear is the water
- Up to which depths do you want to dive
- Flash or no flash
 Water works as a massive light filter. The further you go from the surface, the less light you will have available and importantly, the less red light you’ll have. If you stay above the 10 meter (33 feet) level, this is not a major issue (although it’s noticeable), but if you want to go deeper you simply need to provide your own red light source. This is why photos taken with this kind of equipment tend to be blue all over. Bellow 10 meters, a camera with flash is a must, even in clear waters. This poses another problem: If there are particles in the water, the flash light will reflect on them and overexpose your photos. So, try to choose your camera based on what you want to shoot and the conditions you’ll have in the water.
This might sound too simple if you think that you are used to be worried with apertures, shutter speeds, depth of field, etc., and now you won’t have to. But realize that underwater you have many other things to be worried about: try staying still at 5 meters to correctly frame your photos in a water with just slight current and you’ll see what I mean.
As a guideline, try looking at the specs of three well-known underwater disposable cameras: Kodak Ultra Aquatic, Agfa LeBox Ocean, Fuji QuickSnap Marine.
Taking the shot
As I mentioned above, when underwater you don’t have the luxury of time to correctly frame a shot, or choose the best angle, specially if you intend to shoot wildlife. First, as as you’ll notice very very quickly, unless you take a bottle with you, you need to surface on a regular basis (yes, breathing is essential) and the cute little fish won’t stay there waiting for you. Also, looking through the camera with a diving mask on your face is much harder than it sounds. The fact that you won’t have a zoom on this camera will also require that you get as close as possible to your subject while keeping you and the subject safe.
As a good advice, if you have the time, try shooting your camera of choice on an open-air swimming pool just to get the feeling of it.
If possible, try shooting between 11 AM and 2 PM to make use of the higher levels of light penetration on the water. The angle at which light enters the water earlier or later in the day will reduce the depths at which you can shoot.
Developing the film
While the films inside these cameras have nothing special about them, you can improve the end result by taking it to a shop that specializes in underwater film processing. They are not so easy to find but the difference between the special processing and the regular film processing can have dramatic effects on the prints, making them much more vibrant and reducing the blue cast they will have otherwise.
Although this article is not extensive, I hope I managed to provide a few tips to spark your curiosity about underwater photography next time you go to the beach and improve your experience and results.
Have you tried underwater photography on a basic level? What other tips and experiences can you share with us? Leave them on the comments right bellow.
]]>
With it, I intended not only to discover what my readers had to say on the subject but also to further explore a “side” of photography that is very attractive to me.
Although the complexity of the project was high, and thus the small number of submissions, I feel that Minimalism in Photography is actually something that many try to achieve probably without even realizing it.
Going the minimalist way can produce extremely powerful images, but usually requires a special attention and some planning. Nonetheless, if one thinks minimalism, avenues of images start to open in front of the lens, and even cluttered scenes often have nice subjects for minimalist photos.
I’m also including the images on this post. If the authors prefer that they be removed, just say so and I will.
So, this is what you had to say on Minimalism in Photography (in the order I got them):
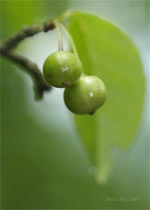
- Kriz Cpec (did I got the name right?) sends a macro shot of what seems to be some small fruits. It’s a very attractive photo with green as the major tone. The shallow depth of field blurs the leaf and branches that blend nicely with the green background. Although it deviates from my own definition of minimalist, the single tonal palette and the focus on one particular subject can probably be sufficient to include it in the category.
 |
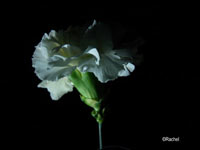
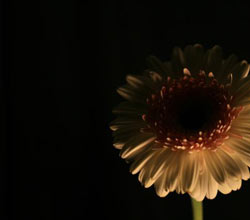
- Rachel from The Feminist Phoenix also went for flora, but using isolation on black (done with lighting) to highlight only a few features of the flowers. I particularly liked the way that the center of the flowers, that usually attracts flower photographers, is in shadows. I’ll have to say that the lighting used for the second photo was absolutely brilliant. Also, the cropping of the frame on the second photo was fantastic, giving it a sense of incompleteness that begs the brain to draw something there. She also shares her insights on these photos.
 |
 |
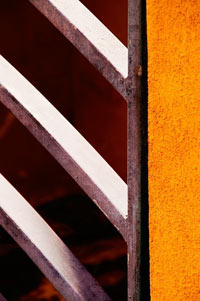
- Brian from the Epic Edits Blog brings us a fantastic article (as usual) in which he describes his approach and experiments to this project, from the preparation to the final processing of the photos. The line that comes out: “simple, minimum, shapes, lines, colors, empty space, look up, look down, walk slow…”. Since he has a collection of his photos there taken with this project in mind, the best is really to go and see them all. It’s worth it. Nonetheless, I’ll drop my favorite here. Notice how a repetition of lines mixed with highly contrasting colors can produce a visual shock (in the good sense).
 |
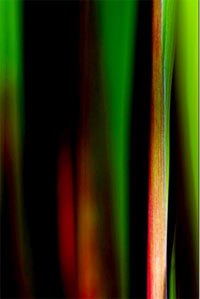
- Chris (almost forgot you, sorry), goes for the color abstract. If I had to guess, I’d say we are looking at a macro of some grass leaves, but whatever it is, it creates a fantastic effect which is achieved mainly by the complementary colors filling the frame (red and green). I’d actually like to know how the processing of this one was done. Care to comment Chris?
 |
- And finally, my own entry to the project. I will not choose any particular photo from it since it is basically a descriptive article with my thoughts on how a good minimalist photo can be achieved. I guess you’ll have to go and read it.
And that is all for this project. To the people who have participated, I can only express my profound appreciation for your superb entries.
I think that from just this few examples we can see how wide this field of photography can be and how worth it is to explore it further.
I have the feeling that this will not be the last time you’ll read about Minimalism in Photography (and not only on this blog).
]]>![]() I’ve mentioned before that I’m not a big Flickr user. I’ve tried it just for some sample photos but never really got into it as a photography social network.
I’ve mentioned before that I’m not a big Flickr user. I’ve tried it just for some sample photos but never really got into it as a photography social network.
Nonetheless, I find it a powerful tool for photographers. The ability to share your work with thousands of users and (possibly) getting your name known as a photographer is a gift that I’m probably wasting.
And now it got even better with the ability to embed your photos on blog posts as easily as you embed a video from YouTube.
How to do this? Easy… There is a new tool out there at SlideFlickr.com that allows you to do just this.
On their site you just have to insert your flicker username or URL to your photos and click Generate. Grab the code, paste it on your post and that’s it…
Want a little bit more customization? No problem, SlideFlickr allows you to customize which photos to include (tags, sets, favorites), sizes, background color of the applet, logo and you can even load your slideshow with some music.
Basically it makes use of the slideshow functionality that currently already exists on Flickr but with an extra kick. And getting the code this easily is enough to be worth a try.
Want to see it in action? These are the only photos I’ve uploaded…
]]>
I though this was one of the most interesting projects that I’ve seen around the photography blogs for some time. The reason is simple: from a starting point, how many interpretations can be originated?
Of course that such a project requires more of a Photoshop (or other photo editing software) knowledge and less camera handling, but as we have been seeing, in silico processing is a major part of photography.
Problem 1: of course that I saw the project a long time ago (actually on the day Brian posted it) but I was always thinking, and as he noted, 3 weeks is a long time… Wrong, never leave the things you want to do for the last minute. Postponing is never the solution.
Problem 2: emails work very well up to the point that they don’t. I’ve asked Brian for the original on the 4th but it seems that he never got that message. Finally, today email decided to work.
Result: Compensating for the time differences, instead of doing a good job, I’m just going to use shortcuts and adjust as I go… I’m not thinking this will be a very good result, but at least I’ve tried.
So, I’ll be writing as I go (also not a good idea) and try to meet the deadline.
Here we go…
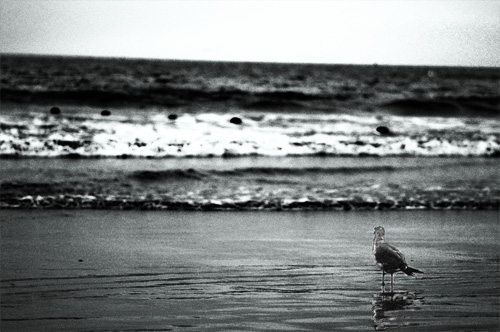
1. The original…
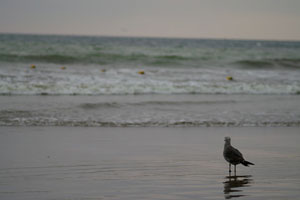
2. Opening the RAW in Lightroom.
My first impressions: the photo was taken in color but due to poor color diversity and saturation, the result was not very color appealing (sky, sea and wet sand all share the same tone). My first reaction is turning it into a grayscale image (of course that, as I mentioned before, I’m partial to B&W photography) so that is the path I’m taking. I’m also planning to make extreme adjustments to create a more texture feeling.
3. Lightroom adjustments
Since the focal object is the seagull (it is a seagull, right?) I want to highlight it somehow. Also, there are some objects (buoys?) floating just beneath the waves. Somehow I feel that they might make nice contrast points on the sea “texture”.
To achieve it, here are my final values for Lightroom:
- Temp: 6650
- Tint: -2
- Exposure: 0.0
- Recovery: 58
- Fill Light: 25
- Blacks: 28 (mainly to compensate for the poor contrast resulting from the Fill light)
So far this is what I got:
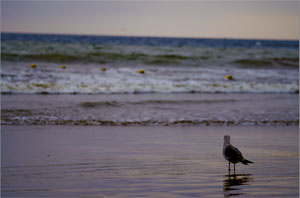
Note how much information the RAW has that can be pulled out. Now we have a more extended color range, texture has been improved and the bird has much more detail.
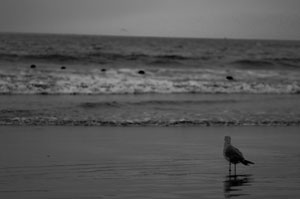
Time to loose the color and go grayscale. Even if we loose the color, the “warmth” can be adjusted. If I was going for color, my choice would be to go as cold as possible. Again, this is my objective from the very first feeling I had when I saw the photo. Many other choices are equally valid and good.
Going cold:
- Red: -76
- Orange: -53
- Yellow: -88
- Green: -81
- Aqua: +4
- Blue: +51
- Purple: -48
- Magenta: -48
So far:
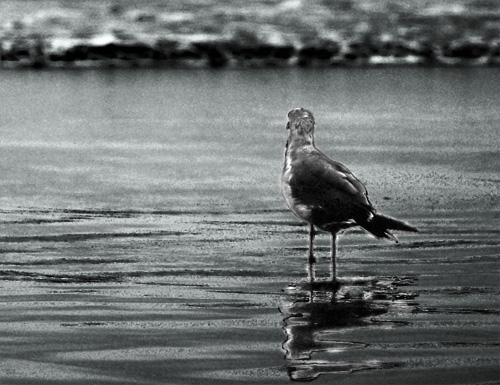
4. And going Photoshop
The true sport begins now. What to do from here? Looking at what I have, I want to increase the contrast and separation between shadows and highlights… Let’s see.
At this moment, I’ve played a bit but I’m not happy at all… One of the reasons is that, wherever I go, I tend to be more attracted to the sea than the bird. Soooo… let’s do something with the background and try later to just minimize the bird and blend it with the surroundings. This requires and extreme approach. As I mentioned above, as soon as I saw this image I imagined an extreme makeover, turning it surreal…
I won’t post step by step pictures but I’ll try to describe what I’m doing as I go…
First thing I did was to duplicate the background layer and blend it as Overlay with 90% opacity. This creates a high contrast image (as intended), clearly separating sky from sea from foam.
Next step was to “minimize the damage” to the original image. I achieved this by adjusting curves in the background layer in a way that I had good detail on the bird (to help in this step a trick is to turn the duplicate layer to 0% opacity and restoring it after the adjustment). Now, I’ve created a layer mask, revealing all the superposed layer. Remember that the objective is to turn the image extreme without loosing detail on the bird. So, on the mask layer, I’ve erased the bird and it’s reflection using a 10px eraser (as you see not so careful, but can’t invest much time on this if I want to make it before the deadline).
So far, we have a high contrast image, even extreme, with the seagull not loosing detail. But the seagull doesn’t fit too well to the image since there is still some dullness in the mask. I overcame this by using the doge tool set to highlights on the background layer in order to increase contrast on the seagull and corresponding reflection. Note that the blown contours are also seen on the reflection. This is needed to keep the effect intended.
The next step was unexpected even for me. I’ve noticed that I can achieve more of the extreme painting effect by actually adding some color to it. So, on the foreground layer I used the channel mixer to reduce the green on the red channel by 6%.
The result is an even more cold image, a bluish gray. I did it on the foreground layer to keep the seagull in monochrome separating it more from the background.
The last step was done to increase the dreaming effect. 25% noise (yes, people try to reduce the noise and I increase it…).
The final result, after 45 minutes of editing and writing, is shown bellow. I hope you like it…
On a final note, and I don’t know how allowed this is according to Brian’s rules, I’ve tried cropping it to highlight the seagull and the result was not so bad. Nonetheless, the above image is my final entry to Brian’s project.
And that is all for image editing for today… pufff…
]]>
The moon has always been a scene that attracts many amateurs and professional photographers. It’s without question the brightest spot in the night sky and maybe due to the lunar mystic or simply due to its beauty a magnet for cameras.
But photographing the moon is not as linear as it seems. The moon is very bright (more than you probably think) and getting the right exposure that avoids the flat look can be tricky.
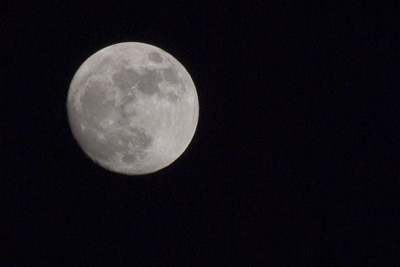
300mm; ISO 100; 1/250s; f/11
Gear
- Tripod – Although it’s a quick exposure, you’ll get the best results setting your camera on a tripod. Remember that you want detail and any kind of motion blurring can ruin the shot.
- Telephoto lens – Ah, how nice and big the moon looks… So why does it come out so small in a photo? It’s like that… For a good moon shot you’ll need a telephoto lens. You don’t need an expensive one (I used the cheap but so far good Sigma 75-300 f4-5.6) but for good detail a minimum of 300mm is recommended.
- Shutter Release cable – Not really needed but recommended. The pressure of your fingers on the shutter button will increase the motion blur. To avoid this you can get a shutter release cable or do like I did (I didn’t had my cable with me) and use the shutter delay feature of your camera (I’m sure it has one). A 2 sec delay is more than enough to get your hands of the camera.
Get busy with that photo
One of the most common mistakes photographers make when first attempting to get lunar shots is underestimating the brightness of the moon. The first shots will almost undoubtedly come out overexposed with an ugly bright circle where the moon should have been.
Many photographers claim that since the moon is directly illuminated by the sun, setting your camera for a “daylight photo” can be a solution. Some also recommend following the sunny 16 rule (f/16 at 1/ISO) or the loony 11 rule (f/11 at 1/ISO). If you take a look at the photo above and the settings I used, none of these actually applied but probably due to the fact that the Earth’s atmosphere absorbs a huge amount of the light and this value varies according to the angle of the moon above the horizon. Using a “fixed” value does not work and you should experiment to find the best results. I tried the following the loony 11 but gave an overexposed moon with some detail loss in the brightest areas.
Start with the following settings:
- Aperture at f/11
- ISO 100 (you don’t want any noise on your photo and it’s so bright there is really no need to go above 100)
- 1/125 – 1/250
Now set your autofocus to point, aim at the moon, focus and turn the autofocus off. Don’t touch that ring anymore.
For good measure bracket your EV 1 or 2 units (if your camera allows you can get a few sequential shots with different EV values).
And that is it. Moon photos galore.
And more…
Now that you have your moon, it’s time to work on it in silico.
The photo above was only cropped. No other processing. So, you can see that is possible to get average moon photos just out of your camera. If you want to make it even better, try playing a bit with the curves on Photoshop. You’ll probably manage to give more texture to your photo by increasing the contrast between midtones and highlights. Somehow I liked the result as it is (albeit flat) and decided not to touch it anymore.
If you want a more natural texture with more shadows, giving the lunar landscape a more tri-dimensional feeling, try shooting the different moon phases and not only full moon. The different angles at which the sun illuminates the lunar surface can create astonishing effects.
Now, this photo was taken back in the end of April, but for what I can see, today is full moon or very close to it. So, why not go outside and be creative? Let’s hope there are no clouds wherever you are.
Got any more tips for good lunar photography? Share them with us…
]]>Until now, unlike Aperture users, Adobe Lightroom users could not upload directly to Flickr. Probably frustrating if you use both regularly.
Although I use Lightroom, Flickr is not one of my first choices of social photography sharing networks, so I never felt much the need for interaction between both.
For those of you who feel this pain on a daily basis, Xof at Digitalfreak.net reports a simple and easy to implement solution to export your photos to Flickr from Adobe Lightroom.
]]>