It’s a full moon today. So, here are a few tips to take great photos of the moon. Grab your camera and go out there.
The moon has always been a scene that attracts many amateurs and professional photographers. It’s without question the brightest spot in the night sky and maybe due to the lunar mystic or simply due to its beauty a magnet for cameras.
But photographing the moon is not as linear as it seems. The moon is very bright (more than you probably think) and getting the right exposure that avoids the flat look can be tricky.
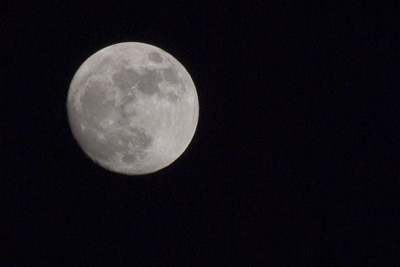
300mm; ISO 100; 1/250s; f/11
Gear
- Tripod – Although it’s a quick exposure, you’ll get the best results setting your camera on a tripod. Remember that you want detail and any kind of motion blurring can ruin the shot.
- Telephoto lens – Ah, how nice and big the moon looks… So why does it come out so small in a photo? It’s like that… For a good moon shot you’ll need a telephoto lens. You don’t need an expensive one (I used the cheap but so far good Sigma 75-300 f4-5.6) but for good detail a minimum of 300mm is recommended.
- Shutter Release cable – Not really needed but recommended. The pressure of your fingers on the shutter button will increase the motion blur. To avoid this you can get a shutter release cable or do like I did (I didn’t had my cable with me) and use the shutter delay feature of your camera (I’m sure it has one). A 2 sec delay is more than enough to get your hands of the camera.
Get busy with that photo
One of the most common mistakes photographers make when first attempting to get lunar shots is underestimating the brightness of the moon. The first shots will almost undoubtedly come out overexposed with an ugly bright circle where the moon should have been.
Many photographers claim that since the moon is directly illuminated by the sun, setting your camera for a “daylight photo” can be a solution. Some also recommend following the sunny 16 rule (f/16 at 1/ISO) or the loony 11 rule (f/11 at 1/ISO). If you take a look at the photo above and the settings I used, none of these actually applied but probably due to the fact that the Earth’s atmosphere absorbs a huge amount of the light and this value varies according to the angle of the moon above the horizon. Using a “fixed” value does not work and you should experiment to find the best results. I tried the following the loony 11 but gave an overexposed moon with some detail loss in the brightest areas.
Start with the following settings:
- Aperture at f/11
- ISO 100 (you don’t want any noise on your photo and it’s so bright there is really no need to go above 100)
- 1/125 – 1/250
Now set your autofocus to point, aim at the moon, focus and turn the autofocus off. Don’t touch that ring anymore.
For good measure bracket your EV 1 or 2 units (if your camera allows you can get a few sequential shots with different EV values).
And that is it. Moon photos galore.
And more…
Now that you have your moon, it’s time to work on it in silico.
The photo above was only cropped. No other processing. So, you can see that is possible to get average moon photos just out of your camera. If you want to make it even better, try playing a bit with the curves on Photoshop. You’ll probably manage to give more texture to your photo by increasing the contrast between midtones and highlights. Somehow I liked the result as it is (albeit flat) and decided not to touch it anymore.
If you want a more natural texture with more shadows, giving the lunar landscape a more tri-dimensional feeling, try shooting the different moon phases and not only full moon. The different angles at which the sun illuminates the lunar surface can create astonishing effects.
Now, this photo was taken back in the end of April, but for what I can see, today is full moon or very close to it. So, why not go outside and be creative? Let’s hope there are no clouds wherever you are.
Got any more tips for good lunar photography? Share them with us…
Bri
September 24, 2010 at 9:10 am
Hi Licia,
I took 30 shots of the moon and used Autopano pro to overlay (stack) them all to try and retain as much detail as possible.
I then used the wavelet sharpener in Registax to sharpen the photo and noise ninja in photoshop cs5 to reduce the noise a little.
Hope this helps.
Licia
September 27, 2010 at 9:23 am
Bri – amazing results! More software than I can afford, though.
I went out this weekend and got a different sort of moon shot that I really like. These settings helped tremendously. I also don’t have a cable or wireless remote so I use the timer to allow the camera to calm down before the pic. Doesn’t work on a windy day, though.
http://flic.kr/p/8EpS5L
Tina
December 27, 2010 at 12:23 am
Thank you for this post! I was finally able to get a fantastic shot of the moon by following your instructions. What a delight.
Pingback: Shoot the Moon « My Digital Memories
juzhax
January 19, 2011 at 1:53 pm
I’ve my setting for my camera too, wish this can help.
http://www.justin.my/2011/01/how-to-take-moon-shoot-using-fujifilm-hs-10-hs-20/
rian
February 2, 2011 at 10:53 am
maybe samiliar with this http://photograpyreview.blogspot.com/2011/01/moon-photography.html
nice tutorial
Mike
February 7, 2011 at 9:58 pm
I am really a novice. I followed your instructions (I hope) but all I got was a very dim image. It was a crescent moon which probably makes a difference, but I did slow down the shutter speed to 60 but could see no noticeable difference.
Adrian
February 12, 2011 at 12:12 am
Thank’s for this post iv’e finally managed to get to get a decent capture just needed a slight tweek in nikons nx2 software to remove a slight light halo,also cropped…Again many thanks for this.
http://flic.kr/p/9h2X7Q
Dylan Dibdin
February 28, 2011 at 11:46 pm
Hey there Antonio, thanks heaps for this guide!! I mucked with it, then moved into a few different settings from those guidelines and got some great results/turn-outs. Here they all are; http://www.facebook.com/album.php?aid=2081908&id=1277340432&l=61c5b88cd3 ((thankyou so much once again, the details given here deffinately worked for me [=))
Lumix Camera Reviews
March 7, 2011 at 2:20 am
As you stated in this post. You MUST have a tripod in all honesty. I just couldn’t imagine anyone trying to take a professional picture of the moon without something to balance the camera on. Some good tips in there though.
Simon Davies
March 19, 2011 at 1:30 pm
Thanks for this. Will try your recommendations if there’s no cloud tonight. Last night I got the ‘bright disc’ effect. I also got a shadow image of the moon which disappeared once I had removed the uv filter from the front of the lens. Thanks again.
Alex
March 19, 2011 at 7:32 pm
http://science.nasa.gov/science-news/science-at-nasa/2011/16mar_supermoon/
Looking forward to capturing this tonight! Thanks a lot for the tips as I’m semi new to photography and just got a killer new camera with 2 lenses!
Ellen
March 19, 2011 at 9:45 pm
Thanks for the clear, informative instructions. Still learning the capabilities of my D90. Most of my work is wildlife and landscapes, but the moon has always been on my “to do” list. Attempts so far have been “fuzzy” at best. Can’t wait to head out with camera and tri-pod after dinner! Thanks again…
Judi
March 20, 2011 at 4:17 am
This was extremely helpful. Just what I wanted to know without having to wade through loads of other stuff.Thank you!
Kelly Douglas
March 20, 2011 at 4:50 am
Thank you so much for the clear instructions. I went out tonight and took pictures of the supermoon and the first ones I took before reading this were like bright lights in the sky the ones I took after reading this look like the moon. Thank you so much for you help.
Sherif
May 15, 2011 at 12:05 am
http://www.flickr.com/photos/sherifkhaled/5215634644/in/photostream
That was my earlier try ..but I will go ahead for a new after a few days again!.
I am having a Casio Exillim FH-20.
Bill
June 15, 2011 at 6:20 am
Thanks for this tip! I was able to finally get a decent shot of the moon…..
Still learning
amanda
June 15, 2011 at 7:59 pm
Thanks Antonio, for moon tips I,m from South Africa gonna try tips for lunar eclipse tonight
Pingback: Need Tips: Moon Photo w/Canon PowershotSX130IS
denver wedding photographers
August 7, 2011 at 5:34 pm
There are a lot of great super telephoto or should I say telescopic lenses. But nonetheless if you capture a great detail and your photo is sharp cropping it won’t be a problem and the shot would totally be looking like those of the ones taken from high end telephoto lenses.
Ann
August 13, 2011 at 6:57 am
Thank you for this article. I only learned tonight how to use the timed exposure aspect of my camera, and then tried to photograph the moon. As you wrote about, the moon was flat. I tried your tips and was very happy with the result.
Namaste,
Ann
Dora E. H. Crow
August 14, 2011 at 7:43 am
I followed your instructions, but only had a 200mm lens and the camera was handheld. The results were great!
I’ll have to borrow a 300mm lens and use the tripod next time and see how much better that is.
Carlos
August 17, 2011 at 3:23 am
Hi Antonio,
Any tips on trying to capture a full moon while it’s reflection is illuminating buildings on the waterfront?
Dan
August 17, 2011 at 3:03 pm
Hi there, I stumbled upon this page after struggling to get a picture of the moon last night and wanted to agree about experiment with the settings until you get it right. I’m still getting to grips with my DSLR but I managed to get this one:
http://ddotphoto.files.wordpress.com/2011/08/dsc01085.jpg
My 75-300mm lense is in the mail however I got this with my 70-210 (at 210mm) using shutter priority at 1/3 second, rear flash to balance out the brightness, f7.1, and ISO-100. The smoke is actually whispy clouds that were passing by.
I never thought to use manual focus or a larger f number so hopefully I’ll get another cloudless night to practise the art! Thanks for the article, very helpful.
Stefanie
September 10, 2011 at 1:42 am
Do I have to have at least a 300mm? I have a 55-200mm lens and I’m having a lot of difficulty
Ulsterboy
September 13, 2011 at 4:14 am
New to this but Thank you for the tip, I’ve a Sony A500 with a Tamron 70-300 lens and i followed your easy to read instructions and am quite happy with the results, my ISO was at 200 as it’s the lowest setting on manual mode.
Thanks again.
Ulsterboy
September 13, 2011 at 4:18 am
sorry forgot to add my pic.
http://img600.imageshack.us/img600/8291/12mbiso2001250aperturef.jpg
Allen
October 12, 2011 at 10:23 pm
my first try at capturing the moon….taken with Canon 450D + 100mm
http://www.flickr.com/photos/9798913@N06/6238796498/in/photostream/
Chione
December 10, 2011 at 5:54 pm
hello! =D Many thanks for the straight to the point advice! it’s my first photoshoot with the moon (and it’s a eclipse~) do drop by my site to see the fruits of ur teaching!
g10
December 10, 2011 at 8:11 pm
Thanks for this post. It was my first outing to shoot moon and am happy with what I got. I shot it immediately after moon came out of eclipse with a Nikon 70-300 mm lens. My settings were f/5.6, 300mm, 1/320 sec, iso 100.
dcs60
December 13, 2011 at 4:57 am
Great instructions! Thank you so much.
Brianna Storch
January 10, 2012 at 10:10 am
Thank you for this advice. I was getting frustrated at looking at an amazing moon tonight but still being such a novice at my camera that I couldn’t photograph what I was seeing.
Following your advice, I took a great shot of the moon. It turned out really clear (of the craters and everything!) and I am really proud to say I took the photo without post-processing!
Tridib
February 9, 2012 at 12:38 pm
Hi,
Thank you for tips. I am a newbie to this field.I tried the settings you mentioned to photograph the full moon with Nikon D7000 18-105mm lens . I found that moon seemed hazy and and not sharp when I enlarged the photograph.
I had kept the camera and lens in AUTO ( AF-S) and VR mode The challenge was that in the live mode moon looked like a spec and fine tuning was a challenge. Is it due to the 18-105mm lens.
Look forward to your help.
Evelyn Vinogradov
March 8, 2012 at 7:32 am
Followed your advice, then combined two images for this odd shot:
http://byvinedesign.zenfolio.com/p59701678/hd2b27#hd2b27
Randal
March 8, 2012 at 8:05 am
I have a canon PowerShot elph 300 HS, I found out how to change the ISO but haven’t been able to change the f stop. Also, I’m using binoculars mounted on a tripod (you use what you got). I need advice on how to change the f stop.
John Murphy
March 13, 2012 at 4:14 pm
I confess to not reading all these posts but will comment anyway.
I have found that if you have a nice or less than a good camera a great moon shot can be gotten during times when the moon is out before sunset or just after sunrise as even the lesser cameras will have an easier time with contrast and over exposure because the sky and moon will be closer in value. Yes you get a blue, instead of a black, background but you can also get some great cloud formations as well on a lucky day.
Keep learning and shoot, the film these days is cheap. lol
John Murphy
March 13, 2012 at 4:29 pm
http://www.flickr.com/photos/11273316@N06/6265241794/in/photostream
http://www.flickr.com/photos/11273316@N06/4896081543/in/photostream
Sorry forgot an example or two… the first is a straight forward hand held morning shot with a long lens, the second shot I braced myself against a tree in an evening sunset and cloudy day shot but liked the drama even if the moon craters were mostly hidden.
product photography toronto
March 14, 2012 at 10:01 pm
Can you do a tutorial on shooting the night sky please?
Rhod Tibbles
April 1, 2012 at 11:34 pm
01/04/2012. Just happened on your website tonite. Was an SLR user for years but last 4 years have been using 10/18x Fuji bridge cameras. Have used many of the functions but never bothered with manual settings. Took straight auto shots of the moon this evening…. just a blurred whiteout ‘blob’. For first time ever, tried using manual functions – using camera handheld, F8, 1/250, ISO 100, about 300mm telephoto, first shot …… bingo…. wife most impressed. !!! Excellent… !!!!
David
April 5, 2012 at 1:57 am
Thankyou!
Was trying to take pictures and getting seriously overexposed results.
Took your advice and got the following on my first attempt (small changes in photoshop).
http://img341.imageshack.us/img341/4898/moonp.png
Will try to get to some areas with less light pollution for my next attempts.
Pingback: Shooting the Moon | Shannon Skypek Photography
Pingback: Super Moon Sat. May 5th. - The Vette Barn Forum - A Community for Corvette Lovers
Pingback: ze moon « Tivat, Montenegro
W"RON"G
May 6, 2012 at 6:40 am
Sweet moonshots are great considering I only got 200mm to work with and no tripod… Thanks for the advice it helped take the brightness out of the shots I was taking last week…… LOL I know I can take some amazing shots with the tools I have but I certianly need to do some more research..
Karl
May 6, 2012 at 7:59 am
Thanks, found it Today, great tip for moon photos, mine here: https://twitter.com/#!/KarlOrange/status/199015145681334272/photo/1
ND
May 6, 2012 at 2:15 pm
great shot! thanks for the tip..
chiPersei
May 10, 2012 at 3:58 pm
Add my voice to the accolades. I’ve taken the occasional full moon photo all my life and unless it was dim and low on the horizon I got the proverbial white blob.
Last Saturday (May 5, 2012) was the super-moon and in preparation I found your tips. Thank you, thank you, thank you.
Feel free to take a look: http://bit.ly/IMORfY
chiPersei
May 10, 2012 at 4:11 pm
Oops! correction above: Super moon was last Sunday, May 6th.
Pingback: Digital SLRs / Photography - Page 4
TB
May 11, 2012 at 8:04 am
Hi,
I am a newbie to moon photography. I have D7000 with 18-105mm lens. Will this be good enough for photographing the moon clearly.
TB